Showing posts with label avocado. Show all posts

Tuesday, May 13, 2014

Shrimp Pazole Verde: Pazolé Verde de Camarones


Welcome, and Thanks for visiting! Like and Follow me on Facebook and Instagram.

Stop by Anytime! 


The influence of international flavors on my cooking is unmistakable. I have always been an adventurous eater. My family would laugh and joke that I would eat anything, now they join in chorus, “Ooo, that’s tasty”!
Latin American food is of my favorites! Most specifically for this post, I LOVE MEXICAN FOOD! I love its depth of flavor, and regional varieties. The fresh and dried chilies, the earthiness, the commitment to savory without being afraid of flavorful spiciness; I am a true fan.

LOVE, I tell you! 
I’ve always held Latin culture and awareness close to my heart. I grew up with aunts who taught me to speak and understand Spanish at a young age.  The world became my oyster. Math deficient, I discovered that I had a talent for “picking up” languages, and an interest in world cultures. This led me to also studying French and German. Academically, I excelled at Spanish literature and poetry recitation competitions. We will NOT get excited about the details right now, but as a preteen, I knew every Menudo, Luis Miguel, and Selena song by heart.  Our four month old is already a fan of José Feliciano. Mexico was the first country I traveled to outside of the United States. There, I met with a welcoming connection to their culture and history that brought me closer in appreciation of my own heritage. Fast forward to the present day Brooklyn, we live in a neighborhood that is a great Latin heritage mainstay. There are Latin specialty stores and bodegas on every corner. 

Ethnically, Latin foods remind me of the warmth and generosity of James Island Soul Food. I fantasize about culinary vacations where I’m posted for weeks in various kitchens shadowing a series of Mexican Grandmothers. The validation of my personal connection to Latin America felt validated after watching thisHenry Louis Gates’ series. It educates the influence of African lineage on Latin America. Food is often highlighted as an important elemental connection.
My favorite Mexican soup, Pazolé is a dish with an extensive Pre-Columbian history. Traditionally served on special occasions, I could just about eat it every day. Pazolé is a soup of richly developed broth, hominy corn, and meat - often pork, chicken, or turkey. There are red Pazolés (Pazolé Rojos) with a base of Mexican red chilies, and green Pazolés (Pazolés Verdes) made with tomatillos.

We’ll be working out a Pazolé Verde with Tomatillos (to-ma-tee-yōs) as the foundation.
Tomatillos at first glance may look both familiar and a little strange.

A fruit that is often referred to as the “Mexican Green Tomato”, tomatillos are actually members of the gooseberry family covered by inedible paper thin-like husks. Imagine a green tomato wearing a ridged paper wind breaker jacket.
We take this Pazolé, in all of its brothy succulence, and then do it up Bon Appégeechee style, equipped with toppings. Optional Toppings include: Crispy fried (or baked) tortilla strips, avocado slices, sliced fresh radishes, fresh cilantro homemade quick pickled red onions, crema (sour cream), and cheese. Sometimes it seems as if I can't eat anything without cheese, here you see white cheddar; however, we’ve also served this soup with grated cotija and sliced queso fresco. The recipes for baked tortilla strips and a quick pickle of red onion slices follow this recipe; However, I digress.

Nothing to be intimidated by, this soup constructs itself in stages all coming together in one pot in the end.  It may be helpful to read this recipe in its entirety to become familiar with its levels before diving in.
If you want an idea for a wonderful way to spend some time in your kitchen, MAKE THIS SOUP! If you want to transport yourself to Mexico on vacation subliminally, MAKE THIS SOUP! If you want to invite some friends over to show them what new you’ve got going on in the kitchen, MAKE THIS SOUP!

Keeping It Real Disclosure:

If you come over for a visit, don’t be surprised if we MAKE THIS SOUP! It’s become a real household favorite.

Bon Appégeechee Shrimp Pazole Verde: Pazolé Verde de Camarones
With Love from the Bon Appégeechee Kitchen
Yield: 6 - 8 people Main Course

Special Equipment: Food Processor or Blender and a stock or large pot

Phase I: The Stock

Keeping It Real Disclosure:
 
I’m starting early in this post. Homemade stock is a glorious thing. It is infectious. Once you have it available in your kitchen, it makes you want to cook things with it.

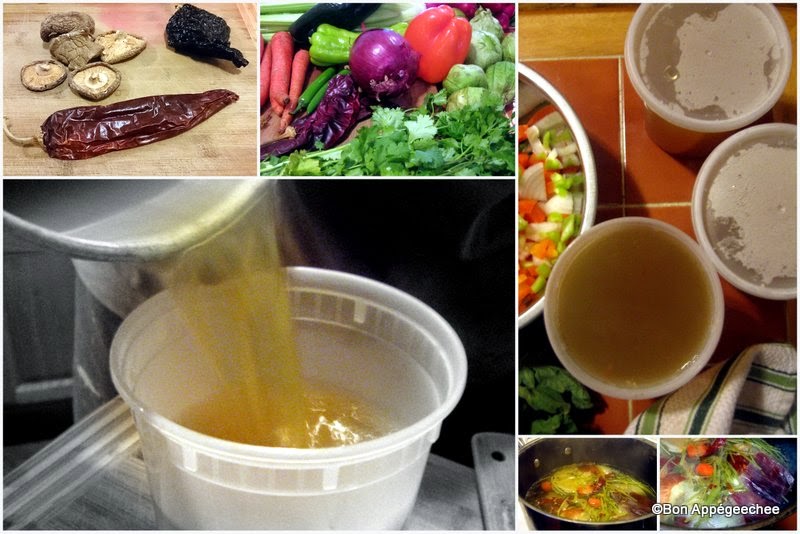
This is a listing of the vegetables we used in this particular stock. Making stock is a well flexible process. WHATEVER leftover raw vegetables you have available, use them. Don’t waste your food. Save the stems when you’re cleaning your greens or trimming broccoli. Save those produce bags that you grab at the grocery store that you don’t know what to do with once you get home. Put your bits of vegetables in them. Once a week get in there and make stock with whatever you have. You’ll be glad you did. You’ll feel satisfied and more connected to your food.

P.S.: If you don’t have vegetable bits to make your stock with, feel free to purchase your favorite boxed vegetable stock.

Side note: We’ll be using approximately 1 quart of stock made from this batch for this soup. If you are using fresh shrimp, once you peel your shrimp, feel free to throw the shells in to the reserved stock to convert some of the vegetable stock into shrimp stock. However, if you’re using frozen peeled and deveined shrimp, feel free to fortify your vegetable stock with 1 – 2 servings of shrimp bullion.

The Madness: The Ingredients
 
Yield: Approximately 3 – 4 quarts of homemade stock

10 quart stock pot
1 dried ancho chili, destem and deseeded
1 dried guajillo chili, destem and deseeded
6 dried shitakes mushrooms
½ small head of cabbage
1 small red onion
½ medium white onion
3 stalks of celery
2 roma tomatoes
Stalks from: 1 bunch of broccoli rabe
Tops from 1 bunch of radishes
Stalks from ½ head of napa cabbage
Stalks from ½ bunch of collard greens

Toss all vegetables in to the large pot. Fill the pot with water, making sure that all vegetable bits are thoroughly submerged or floating in water. Simmer the stock 1 – 4 hours, depending on how much time you have in the kitchen to make stock. The longer you simmer, the more fortified your stock will be; however, even after 1 hour your stock is still richer than if you used plain water in your recipe. Be sure to check on the pot every hour or so make sure water levels remain consistent. If in the end, you’re within a half hour of straining your vegetables from your stock, simply allow the vegetables to continue to cook down without adding additional water. You don’t want to water down your stock, but rather keep good consistent flavor.

Strain the vegetables from the stock. Throw away the simmered out vegetables. Pour your stock in to storage container. Allow it to cool completely before refrigerating, or freezing. We find that storing them in large quart containers work well. You can find them at your local dollar store, or just save them whenever you order large Chinese take-out soup.
 
 
The Salsa Verde

The Madness: The Ingredients

Oven Roasted Vegetables
1 head of roasted garlic
1 medium white onion
8 large tomatillos

Stove Top Roasted Vegetables
1 large poblano pepper, deseeded and destemmed
2 medium serrano peppers, deseeded and destemmed
½ bunch of cilantro, trimmed

Preheat Oven to 500˚F

Prepare the vegetables for roasting:
 
Keep the garlic head whole, paper on and everything.  Place on baking sheet. Slice your onion in half; peel away the outer paper membrane, and trim the root off. Place on backing sheet flat side down. Peel the tomatillos of their paper husk. They may feel slightly sticky on the outside. This is common. Rinse the tomatillos well, dry them, and leave them whole.  I know that this may sound sacraledge, but leave the vegetables dry. No olive oil, no salt, roast them dry.

Roast for 20 - 25 minutes, until the tomatillos start to blacken on top. When you pull out the vegetables the tomatillos will deflat and some will become soft and molten, having just started to burst. The onions will have lost most of their firmness, gaining bit of char color on the flatside and top. The garlic head will still be in tact with soft sweet concentrated cloves inside.


Stovetop Roasting: Poblano and Serrano Peppers
Wash and dry your peppers. Using tongs, place the peppers one at time on top of an open flame burner over high heat. Turn by using tongs, allow all sides of the peppers to roast and blacken.  They’ll look burnt. Never fear, place the blistered and blackened peppers in to a zip lock bag or airtight container to steam through and cool.  The steam separates the charred exterior from the actual flesh of the peppers, leaving beautifully roasted peppers. Allow the peppers to cool for 20 – 25 minutes to allow you to be able to handle them. Once the peppers have cooled, destem and deseed the peppers by making a slit down the side of the pepper. Turn the peppers over to expose the blackened exterior, using the flat side of the knife scrape the charred outside of the pepper. Now you have just the flesh of the roasted peppers, no stems, no seeds, no blackened exterior. There may be bits of char left on the outside. Some rinse their peppers after scraping to make sure that all of the char has been removed. I don’t. I believe in rinsing roasted peppers, all the roasted depth of flavor you’ve just imparted in to the pepper runs down the kitchen drain. Simply take your time in cleaning the peppers and you’ll be able to clear all of the blackened bits.
 
To the Food Processor:
Roughly chop the roasted onion halves and the roasted and cleaned poblano and serrano peppers. Add them to the processor. Add the tomatillos, be sure to collect and add any juices that run from them as well.
Gentle peel the paper from the garlic, revealing the roasted cloves within, add the peeled cloves to the onions, tomatillos, and peppers. Also to the processor add the ½ bunch of cilantro, having trimmed its very bottoms, but include stems and all.
Process these ingredients until the mixture is blended to a thick salsa.

 
Soup Vegetables & Shrimp
2 large carrots, peeled and diced
1 large white onion, peeled and diced
1 large orange pepper, diced
1 long green Italian pepper, diced
2 tbsps. extra virgin olive oil
1 large 28oz can of Hominy, drained
2 lbs. of 26 – 30 count shrimp, shelled and deveined
Wash and dry your vegetables. Into a large soup or stock pot (such as the pot you used to make the stock in earlier) add the 2 tbsps. of extra virgin olive oil over medium heat. Add the diced carrots and onions to the pan. Sauté these vegetables until the onions just start to turn translucent. Add in the hominy. Continue to cook and combine the vegetables in with the hominy for 3 – 5 minutes. Add in the salsa verde from the food processor to the vegetable hominy mixture. Add approximately two cups of stock to the mixed salsa, vegetable, hominy mixture. 

At this point, taste for seasoning. Add salt according to taste a little at a time. Remember you can always add seasoning, you can’t take seasoning away.
Simmer soup for at LEAST 30 minutes to allow the flavors to meld. If you simmer the soup longer and you find that it has thickened a bit too much, add additional stock in ½ cup increments, every ½ hour. I prefer this soup with a viscosity between that of a rich soup and a light stew (not too think, not to thin). We generally simmer soup for an hour or so.  Know that the longer you allow a soup to simmer, the more depth of flavor you’ll have. At this point, your soup can be turned off until you are within 10 – 15 minutes of serving.
Once you are ready to serve add in the shrimp. We generally poach the shrimp directly in the soup at a very light simmer for about 5 – 7 minutes, or until the shrimp are pink. I’m also interested roasting the shrimp and laying them in the soup. If you try roasting before I do, let me know what you think.
 
In all honesty, this soup is a great deal simpler to make that the structure of the details convey. All of the parts come together in one pot as a whole.
Consider this skinny outline now that you’ve read the recipe:

1.   Make you stock
 
2.   Clean and Prep all of your vegetables and shrimp. Shrimp should be kept refrigerated.

3.   Roast your stove top vegetables

4.   As your stove top vegetables are cooling, roast your oven vegetables. The two should be ready for further prep just about the same time, in about 20 – 25 minutes.

5.   Take your oven roasted vegetables from the oven. Allow them to stand.

6.   Clean your stove top vegetables of their char, seeds, and stems.

7.   Process everything that goes in to the food processor (don’t forget the cilantro). Allow that salsa to sit.

8.   Sauté soup vegetables, add hominy, add salsa. Simmer. Patience and a little extra stock go a long way here.

9.   Add shrimp. Poach. (or roast)

10. Eat … and as always, Enjoy!

xo, Bon Appégeechee
 

Shrimp Pazole Verde: Pazolé Verde de Camarones


Welcome, and Thanks for visiting! Like and Follow me on Facebook and Instagram.

Stop by Anytime! 


The influence of international flavors on my cooking is unmistakable. I have always been an adventurous eater. My family would laugh and joke that I would eat anything, now they join in chorus, “Ooo, that’s tasty”!
Latin American food is of my favorites! Most specifically for this post, I LOVE MEXICAN FOOD! I love its depth of flavor, and regional varieties. The fresh and dried chilies, the earthiness, the commitment to savory without being afraid of flavorful spiciness; I am a true fan.

LOVE, I tell you! 
I’ve always held Latin culture and awareness close to my heart. I grew up with aunts who taught me to speak and understand Spanish at a young age.  The world became my oyster. Math deficient, I discovered that I had a talent for “picking up” languages, and an interest in world cultures. This led me to also studying French and German. Academically, I excelled at Spanish literature and poetry recitation competitions. We will NOT get excited about the details right now, but as a preteen, I knew every Menudo, Luis Miguel, and Selena song by heart.  Our four month old is already a fan of José Feliciano. Mexico was the first country I traveled to outside of the United States. There, I met with a welcoming connection to their culture and history that brought me closer in appreciation of my own heritage. Fast forward to the present day Brooklyn, we live in a neighborhood that is a great Latin heritage mainstay. There are Latin specialty stores and bodegas on every corner. 

Ethnically, Latin foods remind me of the warmth and generosity of James Island Soul Food. I fantasize about culinary vacations where I’m posted for weeks in various kitchens shadowing a series of Mexican Grandmothers. The validation of my personal connection to Latin America felt validated after watching this Henry Louis Gates’ series. It educates the influence of African lineage on Latin America. Food is often highlighted as an important elemental connection.
My favorite Mexican soup, Pazolé is a dish with an extensive Pre-Columbian history. Traditionally served on special occasions, I could just about eat it every day. Pazolé is a soup of richly developed broth, hominy corn, and meat - often pork, chicken, or turkey. There are red Pazolés (Pazolé Rojos) with a base of Mexican red chilies, and green Pazolés (Pazolés Verdes) made with tomatillos.

We’ll be working out a Pazolé Verde with Tomatillos (to-ma-tee-yōs) as the foundation.
Tomatillos at first glance may look both familiar and a little strange.

A fruit that is often referred to as the “Mexican Green Tomato”, tomatillos are actually members of the gooseberry family covered by inedible paper thin-like husks. Imagine a green tomato wearing a ridged paper wind breaker jacket.
We take this Pazolé, in all of its brothy succulence, and then do it up Bon Appégeechee style, equipped with toppings. Optional Toppings include: Crispy fried (or baked) tortilla strips, avocado slices, sliced fresh radishes, fresh cilantro homemade quick pickled red onions, crema (sour cream), and cheese. Sometimes it seems as if I can't eat anything without cheese, here you see white cheddar; however, we’ve also served this soup with grated cotija and sliced queso fresco. The recipes for baked tortilla strips and a quick pickle of red onion slices follow this recipe; However, I digress.

Nothing to be intimidated by, this soup constructs itself in stages all coming together in one pot in the end.  It may be helpful to read this recipe in its entirety to become familiar with its levels before diving in.
If you want an idea for a wonderful way to spend some time in your kitchen, MAKE THIS SOUP! If you want to transport yourself to Mexico on vacation subliminally, MAKE THIS SOUP! If you want to invite some friends over to show them what new you’ve got going on in the kitchen, MAKE THIS SOUP!

Keeping It Real Disclosure:

If you come over for a visit, don’t be surprised if we MAKE THIS SOUP! It’s become a real household favorite.

Bon Appégeechee Shrimp Pazole Verde: Pazolé Verde de Camarones
With Love from the Bon Appégeechee Kitchen
Yield: 6 - 8 people Main Course

Special Equipment: Food Processor or Blender and a stock or large pot

Phase I: The Stock

Keeping It Real Disclosure:
 
I’m starting early in this post. Homemade stock is a glorious thing. It is infectious. Once you have it available in your kitchen, it makes you want to cook things with it.

This is a listing of the vegetables we used in this particular stock. Making stock is a well flexible process. WHATEVER leftover raw vegetables you have available, use them. Don’t waste your food. Save the stems when you’re cleaning your greens or trimming broccoli. Save those produce bags that you grab at the grocery store that you don’t know what to do with once you get home. Put your bits of vegetables in them. Once a week get in there and make stock with whatever you have. You’ll be glad you did. You’ll feel satisfied and more connected to your food.

P.S.: If you don’t have vegetable bits to make your stock with, feel free to purchase your favorite boxed vegetable stock.

Side note: We’ll be using approximately 1 quart of stock made from this batch for this soup. If you are using fresh shrimp, once you peel your shrimp, feel free to throw the shells in to the reserved stock to convert some of the vegetable stock into shrimp stock. However, if you’re using frozen peeled and deveined shrimp, feel free to fortify your vegetable stock with 1 – 2 servings of shrimp bullion.

The Madness: The Ingredients
 
Yield: Approximately 3 – 4 quarts of homemade stock

10 quart stock pot
1 dried ancho chili, destem and deseeded
1 dried guajillo chili, destem and deseeded
6 dried shitakes mushrooms
½ small head of cabbage
1 small red onion
½ medium white onion
3 stalks of celery
2 roma tomatoes
Stalks from: 1 bunch of broccoli rabe
Tops from 1 bunch of radishes
Stalks from ½ head of napa cabbage
Stalks from ½ bunch of collard greens

Toss all vegetables in to the large pot. Fill the pot with water, making sure that all vegetable bits are thoroughly submerged or floating in water. Simmer the stock 1 – 4 hours, depending on how much time you have in the kitchen to make stock. The longer you simmer, the more fortified your stock will be; however, even after 1 hour your stock is still richer than if you used plain water in your recipe. Be sure to check on the pot every hour or so make sure water levels remain consistent. If in the end, you’re within a half hour of straining your vegetables from your stock, simply allow the vegetables to continue to cook down without adding additional water. You don’t want to water down your stock, but rather keep good consistent flavor.

Strain the vegetables from the stock. Throw away the simmered out vegetables. Pour your stock in to storage container. Allow it to cool completely before refrigerating, or freezing. We find that storing them in large quart containers work well. You can find them at your local dollar store, or just save them whenever you order large Chinese take-out soup.
 
 
The Salsa Verde

The Madness: The Ingredients

Oven Roasted Vegetables
1 head of roasted garlic
1 medium white onion
8 large tomatillos

Stove Top Roasted Vegetables
1 large poblano pepper, deseeded and destemmed
2 medium serrano peppers, deseeded and destemmed
½ bunch of cilantro, trimmed

Preheat Oven to 500˚F

Prepare the vegetables for roasting:
 
Keep the garlic head whole, paper on and everything.  Place on baking sheet. Slice your onion in half; peel away the outer paper membrane, and trim the root off. Place on backing sheet flat side down. Peel the tomatillos of their paper husk. They may feel slightly sticky on the outside. This is common. Rinse the tomatillos well, dry them, and leave them whole.  I know that this may sound sacraledge, but leave the vegetables dry. No olive oil, no salt, roast them dry.

Roast for 20 - 25 minutes, until the tomatillos start to blacken on top. When you pull out the vegetables the tomatillos will deflat and some will become soft and molten, having just started to burst. The onions will have lost most of their firmness, gaining bit of char color on the flatside and top. The garlic head will still be in tact with soft sweet concentrated cloves inside.


Stovetop Roasting: Poblano and Serrano Peppers
Wash and dry your peppers. Using tongs, place the peppers one at time on top of an open flame burner over high heat. Turn by using tongs, allow all sides of the peppers to roast and blacken.  They’ll look burnt. Never fear, place the blistered and blackened peppers in to a zip lock bag or airtight container to steam through and cool.  The steam separates the charred exterior from the actual flesh of the peppers, leaving beautifully roasted peppers. Allow the peppers to cool for 20 – 25 minutes to allow you to be able to handle them. Once the peppers have cooled, destem and deseed the peppers by making a slit down the side of the pepper. Turn the peppers over to expose the blackened exterior, using the flat side of the knife scrape the charred outside of the pepper. Now you have just the flesh of the roasted peppers, no stems, no seeds, no blackened exterior. There may be bits of char left on the outside. Some rinse their peppers after scraping to make sure that all of the char has been removed. I don’t. I believe in rinsing roasted peppers, all the roasted depth of flavor you’ve just imparted in to the pepper runs down the kitchen drain. Simply take your time in cleaning the peppers and you’ll be able to clear all of the blackened bits.
 
To the Food Processor:
Roughly chop the roasted onion halves and the roasted and cleaned poblano and serrano peppers. Add them to the processor. Add the tomatillos, be sure to collect and add any juices that run from them as well.
Gentle peel the paper from the garlic, revealing the roasted cloves within, add the peeled cloves to the onions, tomatillos, and peppers. Also to the processor add the ½ bunch of cilantro, having trimmed its very bottoms, but include stems and all.
Process these ingredients until the mixture is blended to a thick salsa.

 
Soup Vegetables & Shrimp
2 large carrots, peeled and diced
1 large white onion, peeled and diced
1 large orange pepper, diced
1 long green Italian pepper, diced
2 tbsps. extra virgin olive oil
1 large 28oz can of Hominy, drained
2 lbs. of 26 – 30 count shrimp, shelled and deveined
Wash and dry your vegetables. Into a large soup or stock pot (such as the pot you used to make the stock in earlier) add the 2 tbsps. of extra virgin olive oil over medium heat. Add the diced carrots and onions to the pan. Sauté these vegetables until the onions just start to turn translucent. Add in the hominy. Continue to cook and combine the vegetables in with the hominy for 3 – 5 minutes. Add in the salsa verde from the food processor to the vegetable hominy mixture. Add approximately two cups of stock to the mixed salsa, vegetable, hominy mixture. 

At this point, taste for seasoning. Add salt according to taste a little at a time. Remember you can always add seasoning, you can’t take seasoning away.
Simmer soup for at LEAST 30 minutes to allow the flavors to meld. If you simmer the soup longer and you find that it has thickened a bit too much, add additional stock in ½ cup increments, every ½ hour. I prefer this soup with a viscosity between that of a rich soup and a light stew (not too think, not to thin). We generally simmer soup for an hour or so.  Know that the longer you allow a soup to simmer, the more depth of flavor you’ll have. At this point, your soup can be turned off until you are within 10 – 15 minutes of serving.
Once you are ready to serve add in the shrimp. We generally poach the shrimp directly in the soup at a very light simmer for about 5 – 7 minutes, or until the shrimp are pink. I’m also interested roasting the shrimp and laying them in the soup. If you try roasting before I do, let me know what you think.
 
In all honesty, this soup is a great deal simpler to make that the structure of the details convey. All of the parts come together in one pot as a whole.
Consider this skinny outline now that you’ve read the recipe:

1.   Make you stock
 
2.   Clean and Prep all of your vegetables and shrimp. Shrimp should be kept refrigerated.

3.   Roast your stove top vegetables

4.   As your stove top vegetables are cooling, roast your oven vegetables. The two should be ready for further prep just about the same time, in about 20 – 25 minutes.

5.   Take your oven roasted vegetables from the oven. Allow them to stand.

6.   Clean your stove top vegetables of their char, seeds, and stems.

7.   Process everything that goes in to the food processor (don’t forget the cilantro). Allow that salsa to sit.

8.   Sauté soup vegetables, add hominy, add salsa. Simmer. Patience and a little extra stock go a long way here.

9.   Add shrimp. Poach. (or roast)

10. Eat … and as always, Enjoy!

xo, Bon Appégeechee
 

Monday, April 21, 2014

Avocado Ranch Dressing: Nostalgia Remixed


I’ve always had a weakness for Hidden Valley ranch dressing.  Not the bottled variety, but the dressing that develops as a result of using the Hidden Valley salad dressing & seasoning mix packets.  As a child, these dressing seasoning packets combined with a heaping bit of Duke’s mayonnaise, and as much buttermilk needed to bring on the desired consistency and flavor was how my grandmother adorned garden salads and sliced raw vegetables.

I was hooked: Grandmama, May I have a little salad with my ranch dressing, please!?!  
Though, I enjoy making ranch dressing of all types from foundational scratch – using various dried and fresh herbs, nostalgia keeps at least two packets of Hidden Valley dressing & seasoning mix in our cabinets at all times.  

You never know when your shortcut is going to need a shortcut. 
A couple weekends ago, I brought out one of these packets, and decided to mix it up a bit.

Using Greek yogurt in place of mayonnaise or sour cream is common in our household. What was uncommon was the grand idea to add an avocado to this dressing. We had a perfectly ripe avocado sitting around.  If you know anything about having ripe avocados sitting around, you know that they can go from perfect to past their prime in no time. The addition of the avocado proved both popular and is now highly recommended. The result is a healthier, thicker, richer, flavorful, luscious dressing that could easily double as a dip (note to self).
Yummily speaking, I am sure both Grandmama and Hidden Valley Ranch would approve. You will too!

Avocado Hidden Valley Ranch Dressing
Yield Approximately One (1) Quart of Dressing

The Method: The Ingredients
1 6oz container of plain Greek Yogurt
¼ cup of Duke's Mayonnaise
2 cups of reduced fat buttermilk
1 packet of Hidden Valley Ranch dressing seasoning mix
1 large ripe avocado

No yogurt variation: This particular version proved very popular with our Napa Cabbage Garden Salad.

1 cup of Duke's Mayonnaise
2 cups, plus a little extra of reduced fat buttermilk
1 packet of Hidden Valley Ranch dressing seasoning mix
1 lime, zest and juice
1 medium ripe avocado

The Madness: The Assembly

Add all ingredients into blender or food processor. Cut, peel, and slice your avocado. Add avocado flesh into the food processor/blender with the other ingredients. Pulse or blend ingredients until smooth. If your dressing proves too thick, add an additional ¼ - ½ cup of buttermilk then blend.


 That’s that!

Enjoy!
As always, xo, Bon Appégeechee

*This is not a sponsored post by Hidden Valley Ranch or Duke's Mayonnaise. All opinions are those of Bon Appégeechee.

Avocado Ranch Dressing: Nostalgia Remixed


I’ve always had a weakness for Hidden Valley ranch dressing.  Not the bottled variety, but the dressing that develops as a result of using the Hidden Valley salad dressing & seasoning mix packets.  As a child, these dressing seasoning packets combined with a heaping bit of Duke’s mayonnaise, and as much buttermilk needed to bring on the desired consistency and flavor was how my grandmother adorned garden salads and sliced raw vegetables.

I was hooked: Grandmama, May I have a little salad with my ranch dressing, please!?!  
Though, I enjoy making ranch dressing of all types from foundational scratch – using various dried and fresh herbs, nostalgia keeps at least two packets of Hidden Valley dressing & seasoning mix in our cabinets at all times.  

You never know when your shortcut is going to need a shortcut. 
A couple weekends ago, I brought out one of these packets, and decided to mix it up a bit.

Using Greek yogurt in place of mayonnaise or sour cream is common in our household. What was uncommon was the grand idea to add an avocado to this dressing. We had a perfectly ripe avocado sitting around.  If you know anything about having ripe avocados sitting around, you know that they can go from perfect to past their prime in no time. The addition of the avocado proved both popular and is now highly recommended. The result is a healthier, thicker, richer, flavorful, luscious dressing that could easily double as a dip (note to self).
Yummily speaking, I am sure both Grandmama and Hidden Valley Ranch would approve. You will too!

Avocado Hidden Valley Ranch Dressing
Yield Approximately One (1) Quart of Dressing

The Method: The Ingredients
1 6oz container of plain Greek Yogurt
¼ cup of Duke's Mayonnaise
2 cups of reduced fat buttermilk
1 packet of Hidden Valley Ranch dressing seasoning mix
1 large ripe avocado

No yogurt variation: This particular version proved very popular with our Napa Cabbage Garden Salad.

1 cup of Duke's Mayonnaise
2 cups, plus a little extra of reduced fat buttermilk
1 packet of Hidden Valley Ranch dressing seasoning mix
1 lime, zest and juice
1 medium ripe avocado

The Madness: The Assembly

Add all ingredients into blender or food processor. Cut, peel, and slice your avocado. Add avocado flesh into the food processor/blender with the other ingredients. Pulse or blend ingredients until smooth. If your dressing proves too thick, add an additional ¼ - ½ cup of buttermilk then blend.


 That’s that!

Enjoy!
As always, xo, Bon Appégeechee

*This is not a sponsored post by Hidden Valley Ranch or Duke's Mayonnaise. All opinions are those of Bon Appégeechee.